A few weeks ago, I went ahead and made a display for Christmas (and Halloween at the time). It was a pretty big hit. It may not be the first version of this (8×8 Matrix Instructable), but there were a few changes I made to make it easier to build and use on a regular basis. Specifically, a much simpler way to build the boxes and using an SD card to run all the code.
Below are some instructions in case you want to do this yourself.
Materials:
- 1x 7/16ths OSB 4×8 sheet
- 100x WS2811 LEDs (2 strings, normally. Eg. WS2811 String from Amazon)
- 1x 5v, 6amp+ power supply. Ideally, overrate it. This is the lowest I’d recommend: 5v 8amp Power Adapter on Amazon
- 1/2″ Spade bit, or equivalent
- Optionally, a dado saw blade
- Screws
Overview:
- Cuts:
- 1 back board (30″x30″)
- 2 top boards (30″x3″)
- 18 baffle boards (29″x3″)
- 2 side boards (29″x3)
The overall plan of how to get these from the 4’x8′:

The baffles are made as follows:
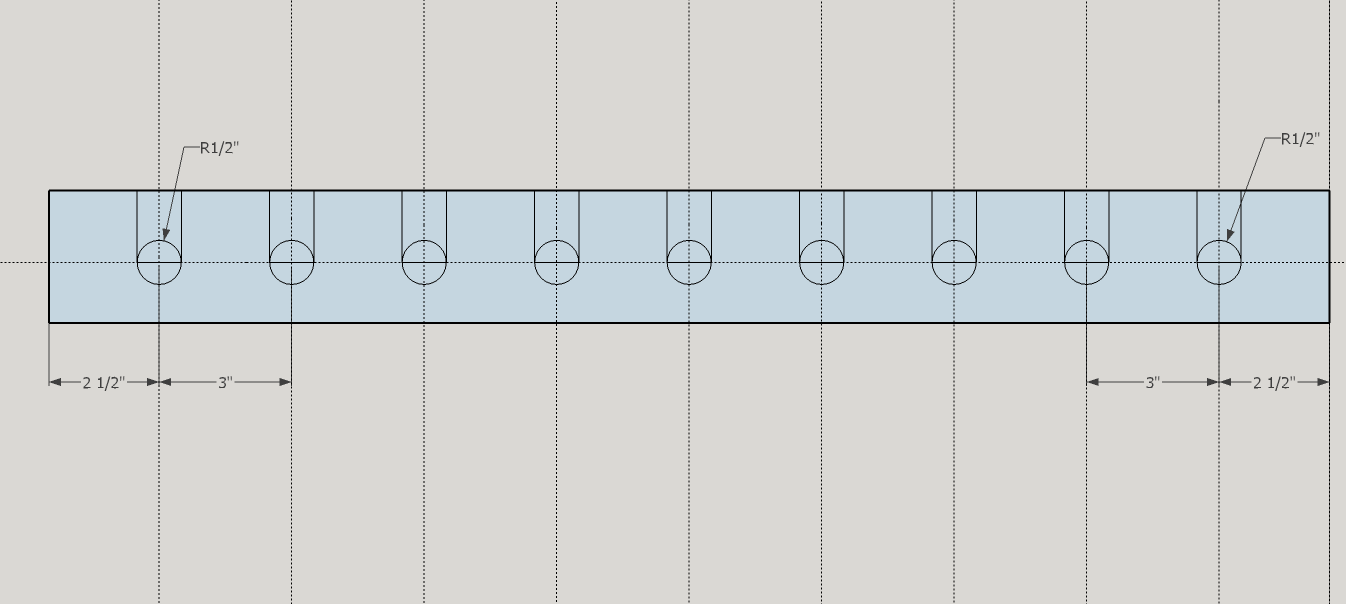
The baffles, essentially are boards with slots cut in them to allow them to create a lattice in coordination with the perpendicular baffles (facing the opposite direction).
To cut the baffles, you have two options:
- Drill 1/2 holes at 1 5/8″, then saw into the holes to create your slots. This is how I made my first display.
- Use a dado blade to cut your 1/2″ inch slots. This is easier since you can stack many of them up and cut them simultaneously – at least, that’s what a friend tells me.
The main tip I have is that you can clamp these baffles together and at least drill multiples at once. Cutting your slots might take longer, unless you’re using a dado blade. In that case you can stack all of them up and just cut your 1 5/8″ slots for all the baffles together. If you want less light leakage between boxes, you can also cut the slots to only 1 1/2″, but the little extra play can help with mint mistakes.
To create the back board:
- Once the 30×30 board is cut, mark every 3 inches along the edges. Then draw the 3×3 boxes by connecting the opposing sides. This outlines where the center of of the baffles will be. Then, to find the centers, draw an “X” between each corner of the boxes. If you’re really good at visualizing what you’re doing, you can also just connect the original hash marks, but that is harder for me.
- Drill out all the centers with a 1/2″ bit. This is where the lights will go.
To assemble it all:
- set the back board on a work table
- Put all the baffles going left/right down on the lines you drew earlier with the slots facing up
- Put all the baffles going up/down on the lines you drew earlier, with the slots facing down and interlocking with the baffles from before
- Put the tops/sides on. To help, predrill holes to connect the tops to the sides and then screw them together. Once this is done, it will help hold all the baffles together through the rest of the assembly
- Now predrill and screw the left/right baffles into the side boards. Doing this will allow you to now lift up the baffle assembly through the next step.
- Predrill and screw in the remaining baffles.
- Finally, predrill and screw the back board into the outer boards.
Update 11/23/17: Code available at https://github.com/jeremyno/ChristmasTron.
You must log in to post a comment.